嵌入式实训过程记录
Ubuntu配置
修改镜像
Setting->About->Software Updates->Download from
1
2
3
| sudo apt install open-vm-tools
sudo apt install open-vm-tools-dkms
sudo apt install open-vm-tools-desktop
|
安装vim和gcc-9
1
2
3
4
5
| suao apt-get install vim
sudo apt-get install gcc-9
sudo apt-get install g++-9
sudo apt-get install gcc-arm-linux-gnueabihf
sudo apt-get install g++-arm-linux-gnueabihf
|
设置gcc-9优先级
1
2
| sudo update-alternatives --install /usr/bin/gcc gcc /usr/bin/gcc-9 100
sudo update-alternatives --install /usr/bin/gcc gcc /usr/bin/g++-9 100
|
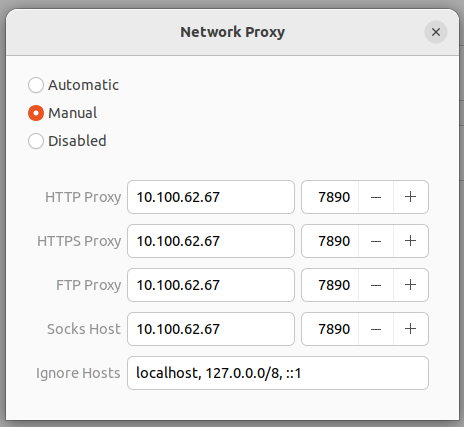
Clash网络代理
安装tftp
1
2
| sudo apt-get install tftpd-hpa
sudo apt-get install tftp-hpa
|
查看虚拟机ip
使用ifconfig查看虚拟机ip
配置tftp服务器
使用sudo vim /etc/default/tftpd-hpa配置tftp服务器
1
2
3
4
5
6
| # /etc/default/tftpd-hpa
TFTP_USERNAME="tftp"
TFTP_DIRECTORY="/home/linux/tftpdir"
TFTP_ADDRESS="0.0.0.0:69"
TFTP_OPTIONS="-l -c -s"
|
创建文件夹并赋予权限
1
2
3
| cd /home/linux
mkdir tftpdir
sudo chmod -R 777 tftpdir/
|
重启tftp服务器
1
| sudo service tftpd-hpa restart
|
上传文件进行测试
1
2
3
| tftp 192.168.1.1
put test.cpp
get test.cpp
|
安装nfs
1
| sudo apt-get install nfs-kernel-server nfs-common
|
配置nfs
1
| /home/linux/nfsdir *(rw,sync,no_subtree_check)
|
创建文件夹并赋予权限
1
2
3
| cd /home/linux
mkdir nfsdir
sudo chmod -R 777 nfsdir/
|
重启nfs服务器
1
| sudo service nfs-kernel-server restart
|
挂载与卸载
1
| sudo mount -t nfs 127.0.0.1:/home/linux/nfsdir /mnt
|
卸载时不能在nfsdir目录下卸载
下载内核、设备树、文件系统到开发板
复制文件
uImage、exynos4412-fs4412.dtb、ramdisk.img从windows拷贝到虚拟机的tftpdir目录下
重启tftp服务器
1
| sudo service tftpd-hpa restart
|
启动开发版
使用pri查看uboot环境变量
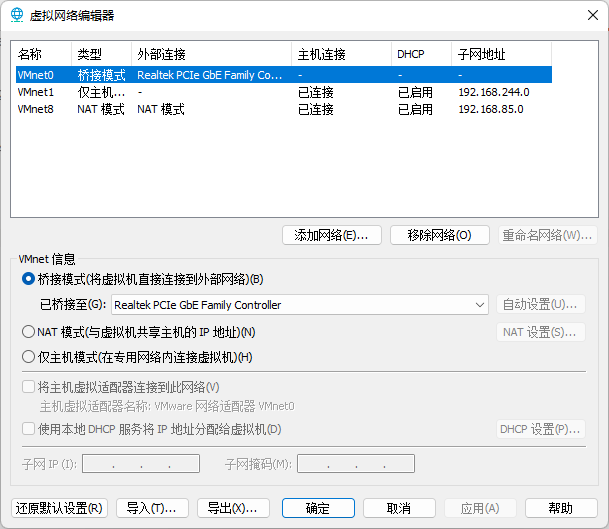
配置网络
虚拟网络编辑器,桥接至Realtek网卡
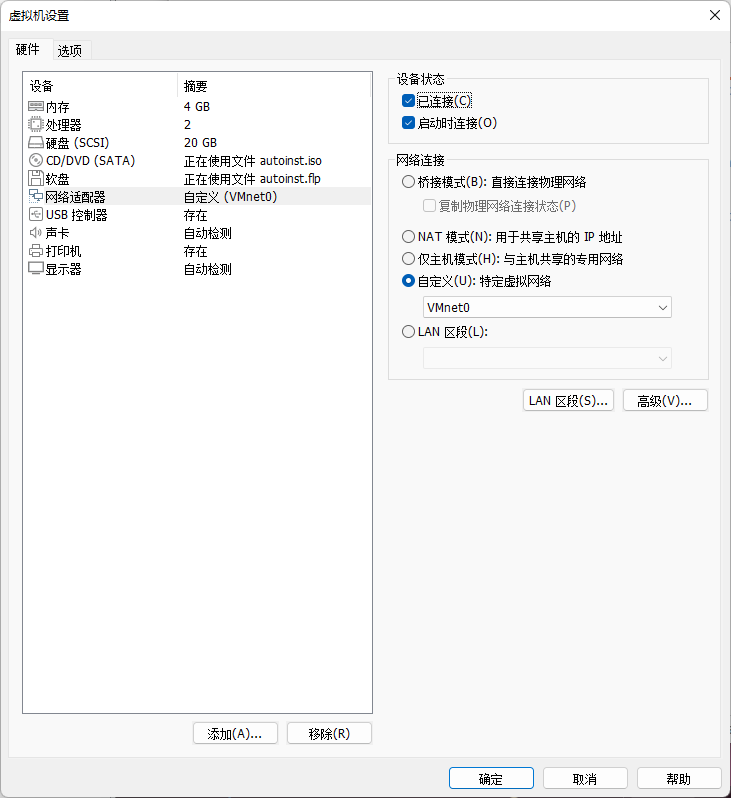
虚拟机设置中网络适配器选择特定虚拟网络
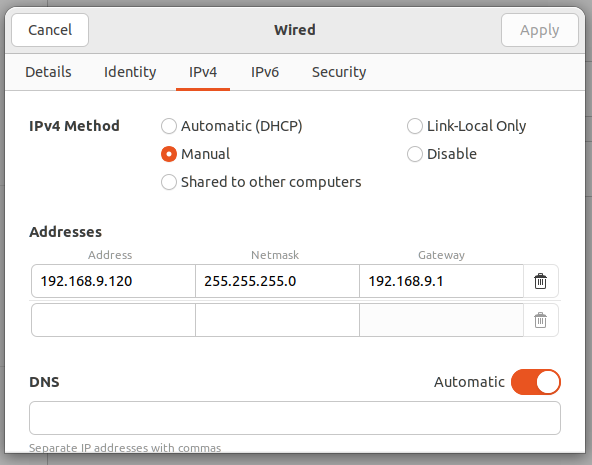
虚拟机中配置ipv4
使用ifconfig查看网络设置
设置开发板ip
1
2
3
4
| set serverip 192.168.9.120
set gatewayip 192.168.9.1
save
ping 192.168.9.120
|
下载文件
1
2
3
4
| tftp 41000000 uImage
tftp 42000000 exynos4412-fs4412.dtb
tftp 43000000 ramdisk.img
bootm 41000000 43000000 42000000
|
uboot移植
配置环境变量
1
2
| set bootcmd tftp 41000000 uImage\;tftp 42000000 exynos4412-fs4412.dtb\;tftp 43000000 ramdisk.img\;bootm 41000000 43000000 42000000
save
|
设置板子启动ip
1
2
| ifconfig
ifconfig eth0 192.168.9.200
|
从虚拟机上下载a.out
1
2
3
4
| tftp -g -r a.out 192.168.9.120
./a.out
chmod 777 a.out
./a.out
|
u-boot移植与烧写
修改u-boot并make
生成镜像并烧写
1
| dd if=u-boot-fs4412.bin of=boot1.img seek=1
|
内核的配置与编译
遇到问题错误:multiple definition of `yylloc‘
参考博客
“不推荐使用,会导致错误”有误,可以不使用,使用ubuntu支持的gcc-9即可,不用修改代码
拷贝内核和设备树文件
1
2
| cp arch/arm/boot/uImage ~/tftpdir
cp arch/arm/boot/dts/exynos4412-fs4412.dtb ~/tftpdir
|
修改u-boot启动参数
注意指令’,’后面不要加空格
- 不是
set和setenv区别导致的
- 由于缺少参数
proto=tcp,nfsvers=3,nolock或者导致的卡在Verifying Checksum ... OK
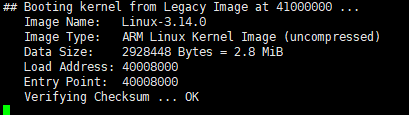
1
2
3
4
5
6
7
| # 老师给的指令缺少参数
# setenv bootcmd tftp 41000000 uImage\;tftp 42000000 exynos4412-fs4412.dtb\;bootm 41000000 – 42000000
# setenv bootargs root=/dev/nfs nfsroot=192.168.9.120:/home/linux/nfsdir/rootfs rw console=ttySAC2,115200 init=/linuxrc ip=192.168.9.200 clk_ignore_unused=true
# boot
setenv bootcmd tftp 41000000 uImage\;tftp 42000000 exynos4412-fs4412.dtb\;bootm 41000000 - 42000000
setenv bootargs root=/dev/nfs nfsroot=192.168.9.120:/home/linux/nfsdir/rootfs,proto=tcp,nfsvers=3,nolock rw console=ttySAC2,115200 init=/linuxrc ip=192.168.9.200 clk_ignore_unused=true
boot
|